
How to Nest Audio Clips in Premiere Pro
To nest audio clips in Premiere Pro, first select all the audio clips on the timeline that you would like to put in that nest. Then, after all the audio clips are selected/highlighted, right-click on one of the audio clips and then choose “Nest”.
How to Nest Audio in Premiere Pro: Step-by-step Guide
Step 1: Select all the audio clips that you would like to nest at once
Step 2: Right-click on one of the selected/highlighted audio clips and then choose “Nest.”
Step 3: Enter a name for the nested sequence
Step 4: Click on “OK” to confirm
Why Would You Nest Audio in Premiere Pro?
Nesting audio clips in Premiere Pro allows you to make important changes to all your audio clips at once. For instance, after editing a video, you might want to denoise all of your audio and add some compression to it. In case your audio is nested, you can apply effects and changes to the nested audio file, which means that the adjustments will be applied to all the audio clips within the nest.
After You Nest Audio, Make Sure to Render & Replace
Let’s say you edited a video and ended up with a million audio clips, as you had to cut out lots of unnecessary audio.
In this case, it only makes sense that you nested your audio, so that you can make some major adjustments to all the audio clips at once rather than editing and adjusting them one by one.
Now, after you nested your audio clips, you will likely notice that the lovely waveform won’t show anymore on your nested audio clip. In some cases it does and in some, it does not.
To restore that waveform and also to make sure that you can edit your audio in other software such as Adobe Audition, you have to apply “Render & Replace” to your nested audio clip.
To do so, simply right-click on your nested audio clip and choose “Render & Replace.”
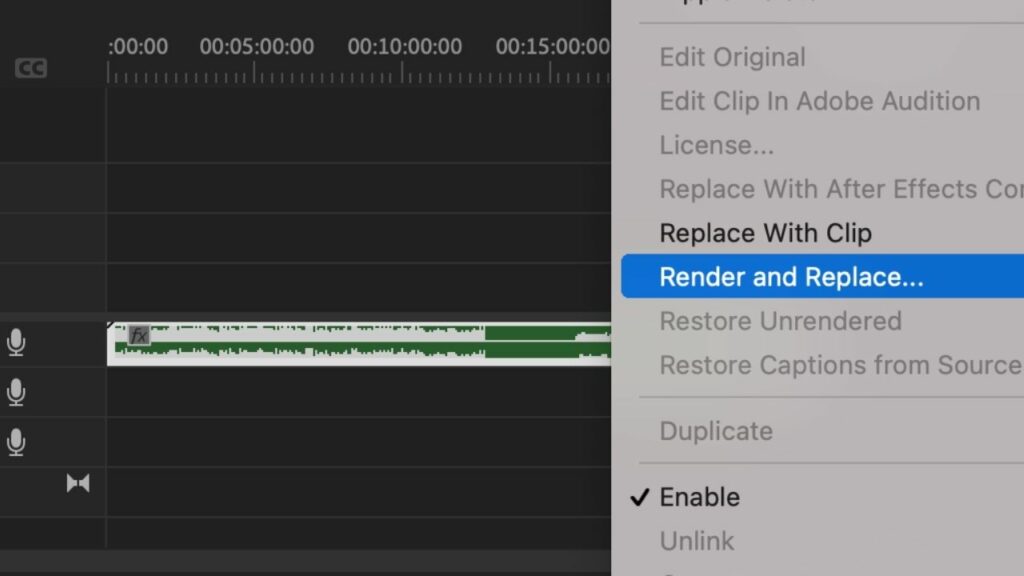
The waveform will then be visible again and in case you would now like to further edit your audio in Adobe Audition, you can simply right-click on the clip and then choose “Edit Clip in Adobe Audition.”
Frequently Asked Questions about Nesting in Premiere Pro
Can I nest video clips in Premiere Pro?
Video clips can be nested as well in Premiere Pro. No problem at all.
What is the difference between nesting and grouping clips in Premiere Pro?
There are a couple of differences between nesting and grouping. If you would just like to move certain clips together on the timeline, it is usually better to use grouping. If you want to apply effects and other adjustments to a group of clips at once, nesting is usually the answer. However, there are many more differences. Video Revealed has a great tutorial on that.
Can you unnest clips in Premiere Pro?
There is no unnest button in Premiere Pro. However, when you double-click on the nested sequence, you will see the clips in their unnested, original form. You can then copy the unnested clips and then just simply paste them wherever you want to bring the unnested clips back.
How can I apply audio effects to several audio clips at once in Premiere Pro?
To apply audio effects to several audio clips at once, either make sure that all the audio clips that you wish to apply the effects to are on the same audio track and then just add the effect to that very audio track or nest the audio clips by selecting/highlighting them all at once and then right-click on your mouse and choose “Nest.” Then, when you apply an audio effect to that nested sequence, the effect will also be in place for all audio clips within that nest.
cialis 10mg reviews
Saturday 6th of January 2024
cialis 10mg reviews
cialis 10mg reviews